Showing posts with label sewing. Show all posts

Monday, July 25, 2011

Making Happiness Happen

I read an article that a friend posted to Facebook that really got me thinking and inspired me. (You can find it here.)

My take away from the article included a few simple ideas:
1. We are in charge of our happiness and we can choose to be happier people. 
2. Building a life out of quality relationships and life experiences can make your life richer than working crazy hours at your job.
3. Accumulating more "stuff" in our lives truly doesn't make us more happy. There will always be more "stuff" to buy, so maybe it makes more sense to simply appreciate what you've already got and refurbish when possible.
So, what the heck does all this have to do with crafting?!? In a word, simplification. I have a need to make things in my life more streamlined and and more simple.

To support this idea, I decided to try my hand at refashioning this weekend. I figured it would be a refurbish on something I already own, so I'm not buying anything new or throwing anything away--It's cost neutral, yet if all goes well, I'll have something else to wear in my closet. It's also something I could do inside since it's so dang hot out, and a cool, breezy dress will be just what the doctor ordered once I do need to head out to run errands on the weekend.

This time last year, while I was happily pregnant, I purchased a few items of clothing that were incredibly comfortable. In this batch of clothing that -- thankfully -- is now too roomy in the belly, I had two sundresses that I'd love to be able to put to use this summer. My idea was to blend something like this dress:

with this:


I wanted to better define a waistline and make the dress appropriate for my non-maternity self. So here's what I did:

I turned the outfit inside out and measured the length of elastic that was already sewn into the dress below the bustline. I then cut a few pieces of 1/4" elastic at the same length and pinned it into the dress about 1 1/4" below the original elastic.


Then, pulling the elastic taut as I sewed, I ran a zigzag stitch along the length of the elastic.


I did this twice more on the front and the back, each row about 1 1/4" below the previous row.


Now, I've got to get working on the other dress! I'll show you the end results in the next post.

Sunday, June 19, 2011

Fun New Supplies to Try Out

So I stopped in at JoAnn since they had a big sale this past weekend and picked up a few new supplies that I want to try out. I'm curious to see how I can work these in to my repertoire.

First up, I bought a few different types of elastic. Dare I say, I'm getting precariously close to starting to sew with knit fabrics. I think I'd like to attempt to make a simple tank top for A with some of this stuff. I just need to figure out the best application.


(On a side note, I'm enjoying how writing and posting about different projects kind of commits me to trying new projects!)


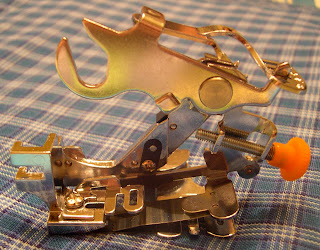
And second up, I bought a ruffle foot for the sewing machine. Yes, I know that ruffles can be made without them, but I've been eager to give one of these a whirl. When I take this one for a test drive, I will be sure to document my progress and share with you.

Lastly, you'll notice some fancy schmancy plaid in the background. Thankfully, it's not a huge surprise for my hubby, but I'm going to give some grown-up sized pajama pants a try for Father's Day.

Any advice for me on the new gear? Drop me a line in the comments below.

Wednesday, June 15, 2011

Back in Business!

I was able to pick up my sewing machine yesterday at Quilter's Alley--a day earlier than I'd originally anticipated. Their owner, Stuart, is such a sweet gentleman, and even helped put the machine into my car for me.

The machine itself is running beautifully, and is clean as a whistle! He had good advice for keeping my machine in good repair for the long term, (like making sure it wasn't left in extreme temperatures) and his shop offers lots of different classes--not just for quilting, but also for apparel.

Can't wait to stop back in!

Tuesday, June 7, 2011

Trouble's Brewing!


I started a new freelance graphics gig late last week and this week I realized that I'm within walking distance of a quaint little quilting & fabric store AND a great bead store. I checked both out today, and (alert the media!) walked out spending less than $12 total. But I'll be back!

Great news for this blog.

Not so much for my pocketbook.

Stay tuned, blogosphere, stay tuned.

ps: I may take a short break from the sewing since I'm planning to take my trusty Kenmore to have it tuned up at the shop I found today. It's been a total workhorse, and has survived 6 moves in three states and two floods. Who knew you were supposed to do this yearly?!? I get it done about NEVER once every twenty years, apparently.

Saturday, June 4, 2011

Copying a Baby Dress

Over Memorial Day weekend, my younger daughter wore a hand-me-down dress that I absolutely love. 

As we were driving home, sleeping kiddos in the back in their car seats, I let my mind wander a bit about that dress and how it was constructed, and I wondered if I could copy that dress using fabric that I had on hand. So I decided to give it a try, and it worked remarkably well for me. Here's how I did it:

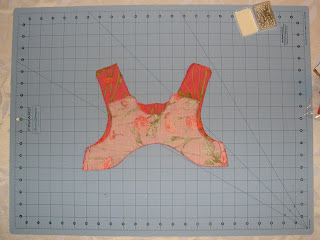
First, I turned the original dress inside out and traced it. I traced the back...


...And I traced the front. I did not include any seam allowances.


Next, I used two fat quarters and tried to see if I could fit the pieces all together.


If you look closely, you'll see that I cheated a little. Instead of cutting the back yoke on the fold, because of its awkward shape, I cut two and decided I could live with a seam down the center back. You'll also notice that I added in my seam allowances.


Next, since I don't own a serger, I zigzagged around all the pieces.


I then sewed the back and the front together along the side seams and pressed the seams open.


And after sewing the two back yoke pieces together, I sewed the front yoke and back yoke together along the side seams as well.


Next, I turned the dress right side out and sewed the yoke and the dress together. To keep the yoke from riding up once the dress is worn, I stitched in the ditch along the side seams to connect the yoke to the dress.


I then cut notches along all the curves that would be turned out.


Be sure you don't cut all the way to the seam!


Once the notches were cut, I turned the dress right side out and ironed the seams. Then came some new learning for me: after owning my sewing machine for nearly 20 years, I finally taught myself to use the automatic button hole attachments. What a dream!


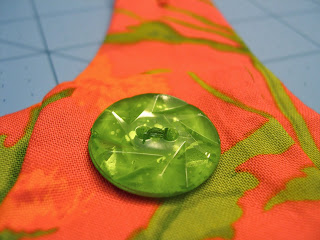
And I sewed the buttons on.


And once I hemmed the dress, it was done.

I have to say, this project was a real confidence booster for me for a few reasons. First, I used attachments on my machine that I've somehow managed to put off and put off for decades(!). Second, it taught me that I can make something a little more involved and create my own pattern. I think I may copy a few of my older daughter's dresses, including one that has some sweet pleats. Again, it has a very simple shape, and a good challenge. I bet I can do it.


I can't wait to see it on her!

Friday, June 3, 2011

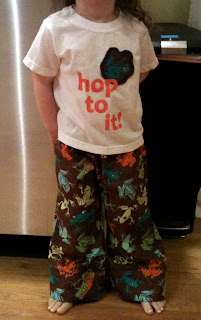
Hop To It Lounge Outfit

I was feeling particularly industrious recently and decided to sew a pair of comfy pants and make a matching shirt for A. 

We went to the fabric store and I let her pick out appropriate fabric.


I used the basic kids pants pattern from one of my very favorite blogs, Made, found here.


Then I selected a cute frog to applique to the t-shirt.


I used fabric stabilizer for the first time and completed the applique using a satin stitch on my sewing machine. I stitched to the inside of the edges of the applique to allow it to fray a little as it would be washed.


I was able to print my stencil directly onto the freezer paper, then cut it out and adhered it to the t-shirt, like I did in the Freezer Paper Stencil Wall Art tutorial.


I used a coordinating fabric paint...


...and when it dried, I peeled the stencil away. 


Here's the finished set.


It fit A really nicely, with a little room to grow!

Wednesday, June 1, 2011

Quick and Easy Girl's Skirt

My daughter loves checking out my fabric stash, and recently, I decided to make something from a few fat quarters that she had her eye on. I wanted to keep it simple so that it could be completed while our other daughter was napping. I worked out the pattern pretty quickly in my head (but will soon publish a tutorial so you can follow along). This skirt fits a 3T, and only requires two fat quarters. 


We ended up pairing it up with one of the freezer paper stenciled t-shirts.


Perfect for spring and summer!

Tuesday, May 31, 2011

Fairy Princess Skirt and Headband

A had a pretty princess-themed birthday party recently, and since we were attending as a family, I thought that little V should have a costume of her own. I wanted to be sure to keep it comfy, so I decided to have her wear an existing onesie and add an elastic-waisted skirt and headband to it. I didn't have a pattern, so I just winged it (like so much of the sewing I do).

For the skirt, I measured V's waist and cut a piece of pajama elastic about an inch longer and set it aside. Then I cut lots of almond shapes from scraps in my stash--some from quilting fabrics, and some pink tulle. Since I wasn't expecting V to wear this on a regular basis, I didn't bother finishing the edges of the fabric shapes.

I folded them in half and overlapped them to make a skirt shape, and then sewed a seam about 1 inch from the fold to make a casing. Then I carefully inserted the elastic and maneuvered it through all the different layers until it was looped through the entire skirt.

Once the elastic was completely in, I overlapped the ends about an inch and sewed them together. I then re-distributed the gathers. To finish the skirt, I cut a few strips of fabric on the bias and made a few overlapping loops, like a Christmas bow. Then I took about an 18 inch length of ribbon and hand sewed a running stitch along the length of one side. I then gathered the ribbon to make a flowery puff and hand sewed the puff and the lopped fabric to the skirt.

For the headband, I measured V's little noggin and cut a piece of 1/4" elastic 1 inch longer. I overlapped the ends by an inch and stitched the two overlapping ends to each other. I then cut strips of fabric on the bias and sewed them onto the elastic using a zig zag stitch while stretching the elastic. Using the same technique on another piece of 18 inch organza ribbon, I made another little flowery puff and sewed it onto the headband.

Here's the final result:

Friday, May 27, 2011

Stuffed Animal Clothes, Part 2

Yesterday, A started up again. This time she said, "Mom, Little Red needs a jacket."

One thing you should know about my girl, she has distinct names and personality for all of her stuffed animals. There's Little Red, and in the last post, you also saw SeƱor Bee, Alice the Bunny and Pat the Bunny. I'm sure you'll meet more friends as this blog continues...

But back to the jacket.

Up to this point, I'd successfully avoided doing doll sleeves, but this time there was no getting around it. And little did I know that the baby would take a 3 hour power snooze, so I couldn't get around it that way.


So I grabbed Little Red, traced around him and added about half an inch for seam allowances. Then I folded my fabric in thirds and cut it out. I did this so that I created three pieces of material--the left front, the right front and the back. Whatever sleeves I didn't need (the left front wouldn't need a right sleeve, and vice versa), I cut off with my rotary cutter. But I allowed the front pieces to overlap each other a bit.

Then I sewed the sides and undersides of the sleeves up on each side. For the seams across the tops of the sleeves and shoulders, I made sure that I left room for Little Red's neck. Once these basic seams were complete, I decided that the easiest and quickest way to finish the edges would be with bias tape. And with the bright print I used, the bias tape added another pop of color, and tied the whole look together.

I added bias tape first to the bottom of the jacket in a straight seam. Then along the left and right fronts, and then around the collar. I didn't even bother tucking the bias tape because it naturally won't fray. I left the edges raw instead.

The last part was the cuffs. This is really where my challenge was with this project. I tried a few things. First, I tried to actually fit that teeny cuff under the presser foot. What a mess! It was much too small, unless I'd had the forethought to add the bias tape prior to seaming the fronts to the back. (Note to self--do this next time!!)

My next thought was to hand sew the edge--maybe a slight fold using a blanket stitch? Goodness, no. That just looked awful and ratty. So in the end, I decided to chain stitch the bias tape around. As you can see, the left sleeve was completed first, and by the time I got to the right sleeve, my technique improved.


The end result made for a slightly modern and asymmetrical jacket with kind of a funnel neck. The stitches are pretty crooked, but I kinda like it.

Thursday, May 26, 2011

Stuffed Animal Clothes, Part 1

So my daughter keeps telling me, "Mommy, (insert stuffed animal name here) needs a new (article of clothing)!"

Since I started staying home, I've tried to keep things fun for A by occasionally making outfits for her stuffed animals. These are never done with actual patterns. In fact, it's totally on the fly, usually raiding my fabric stash. I like to think of it as a very tiny version of Project Runway, because my deadline is the end of my other daughter's naptime.

Here are a few recent ones.


I've found this to be a real treat for me because it allows me to work on my sewing technique using much smaller pieces of fabric like fat quarters and scraps, so there's less of a monetary and time investment. Also, I generally don't get too overly fussy about things like hems, pockets, straight seams or buttonholes and zippers--I use velcro since these items are meant for preschooler-sized fingers.

I've even made some bedding.


The results are quick, and A is soon off to her toybox, taking the new outfit off and trying it on another stuffed animal.