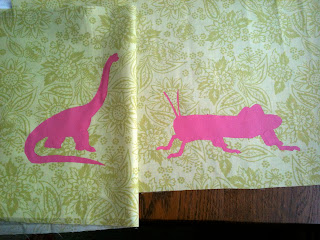
When my oldest child moved into her "big girl room", we did the painting and moved in the furniture without a hitch. But her walls have been looking a bit blank. So I decided to create something to dress them up a bit. I decided to make 4 pieces of art that would function as a set, and use either cheap-o materials or things I already had on hand.
For this project, I used the following:
2 fat quarters of fabric
2 different fabric paint colors with sponge brushes
freezer paper
4 framed pieces of "art" from the dollar section
white wall paint that I had on hand
a staplegun
I prepped the frames by painting the over the existing "art" with white paint. I used two coats for opacity, and set them aside.
I then asked A what animals she would like to see on her wall and her selections included a dinosaur (of course), a grasshopper, a kitten and a bunny. I found silhouettes online and printed them the size that I wanted them to appear on each canvas. I then traced the images onto freezer paper and cut them out using an xacto and a cutting mat.
Once my stencils were cut, I positioned them glossy side down onto my fabric (making sure I left extra space around the edges of the fabric to attach it to the frame later). With a warm iron, I adhered them to the fabric.
Once the fabric was cool, I used a sponge brush and applied the fabric paint to the fabric. Make sure that you're working on a protected surface, in case any fabric paint bleeds through. Again, I used two coats for opacity, and I let each one dry.
Once they were dry, I gently peeled back the stencil to reveal crisp outlines of each creature.
After the stencils were all removed, they were ready to attach to the frames. I used my staple gun (what fun!), starting at the top center to allow space for the wall hanging hardware. I then pulled the fabric to snugly fit to the bottom of the frame, and then worked on the right and left sides. They were finished with "hospital corners" and the fabric was stapled to the back of the frame. Viola!
I can't wait to see them hung on A's wall.
So what to do with the freezer paper shape that is cut out of the stencil? Make fun t-shirts of course! The process is just the same, but I used a round stenciling sponge brush to create a soft edge all around the creature.


No comments:
Post a Comment